Thursday 8 December 2016

The Sad Robot, How it Came to Be

Back in the summer of 2013, fresh out of college and having chosen UCA's CG Arts & Animation course (now known as Computer Animation Arts) as my go-to destination for University, our course leader-to-be set us the task of adapting 13 random objects (Fig. 2) into 100 concepts, before translating 3 of those concepts into orthographic projections of a machine, life-form and a structure; concepts 24, 88 and 41 respectively. Looking back I remember worrying over getting all 100 sketches done, but once I got into it I was well on my way to 101. Wow, 19 year old me stressing over 100 thumbnail sketches, oh how little I knew back then!

Roll forward 3 years to post-graduation, looking for inspiration I decided I'd use my improved graphic design and 3D modelling skills to turn some of these hand drawn sketches into clean orthographics, and finally a working 3D model.  The aim is to build the robot to work like machine, one that that can be rigged and manoeuvred appropriately. In my next progress update I will be publishing screenshots of the digital orthographic development and modelling process up to this point.

Fig. 1: 3 years in the making, 1 & 0 (on & off)

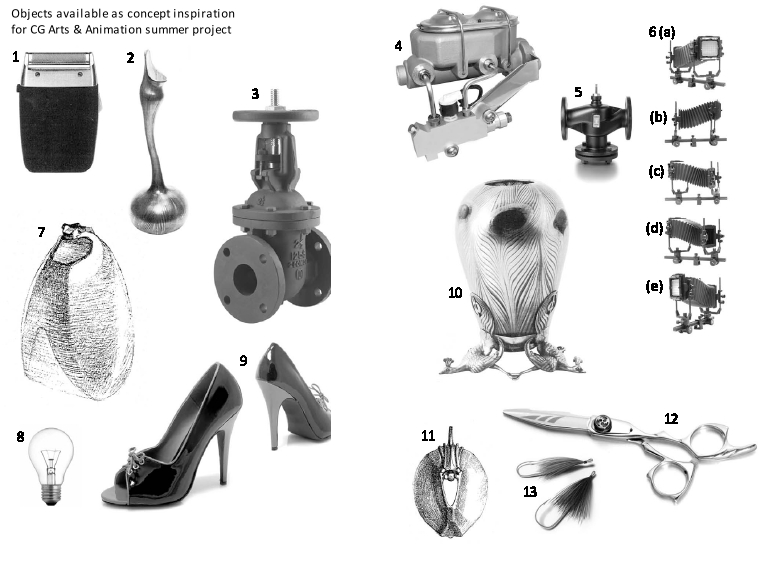
Fig. 2: The original objects

Tuesday 5 July 2016

[ND16] 17: The Art of Elements Academy; Re-Upload

For unknown reasons my original Art Of upload on Scribd can not be accessed on the website, claiming that this document has been removed from Scribd, even though it is accessible when I'm signed in to the website, meaning other people are unable to embed it. The same problem occurs when I re-upload a new version, so I've uploaded it with Google Docs instead.


The embed code is: 

<iframe src="https://drive.google.com/file/d/0B6IRjigAdvGFaG1iVHUxMVdSdTQ/preview" width="640" height="480"></iframe>


For this blog post I have changed the code's width value to "750", which automatically changes the height with it.

Wednesday 29 June 2016

[Review] Render Farm: GarageFarm.net


GarageFarm is a render farm first recommended to us by Phil, one that has proven extremely worth it for all those of us who have used it. The staff are helpful and approachable, as well as easy to access when you need help, all it takes is a single click of the speech bubble icon; there are staff on hand 24/7, so you don't need to fear if you need to render quickly in the middle of the night --which is pretty much an animator's rite of passage!-- and don't know what to do. 


Even if a real person wasn't on hand, they have various video tutorials and a forum to help you find answers. Like any new software, figuring out how to set things up can be confusing at first, but once you know how to do it, it becomes really straightforward. In order to send off your renders you have to first create an account & download their Render Beamer, which is available for Mac and PC - once downloaded you can access this via Maya's new renderBeamer shelf. 

Unfortunately we are currently unable to download the Render Beamer on the University computers because of limited download permissions, but once the render has been sent off via a home computer you can keep track of its progress on the website. The Web Manager is well designed and shows you the progress of your render, while also listing its cost in dollars. GarageFarm has a price calculator that lets you figure out how much your renders are going to cost, before you even have to jump in at the deep end.


Using GarageFarm is extremely worth it because the render turnaround time is quick, their pricing is transparent and it gives you a lot of extra time to spend on other aspects of your project. You even have the option of rendering your scenes with different levels of priority, depending how desperately quickly you want to receive your finished renders.

Two small nuggets of advice, before sending off a file to the farm make sure you tick Apply Output Transform to Renderer under Color Management in the Common tab of your Render Settings, otherwise your images wont render with colour management applied. Finally if the renderBeamer icon randomly vanishes from your shelf, you can bring it up with this bit of Python script...

from mayaBeamer import main
reload(main)

main.run()

Just paste it into your Script Editor under the Python tab, highlight the text, press the play icon and you're golden :) Good luck and may getting your work rendered never be stressful again!

Sunday 19 June 2016

Thursday 16 June 2016

@Alan [ND16] 12: Elements Academy; Act II Pre-Vis - Pts 1 to 4

@Phil [ND16] 11: Business Cards; Hydrogen Twins Edit

Below is my edited version of the Hydrogen twins back design. I've rendered the two characters separately to remove the face shadows from Hydrogen 02 and composited them together in Photoshop. Previously approved business card images can be found here...


I'm printing my business cards with moo.com, because it allows me to include multiple different back designs in any set (e.g. 50 cards). It also provides the option of giving your business cards rounded edges, an option that I am definitely going for due to the child-friendly nature of my characters, which using smooth, rather than sharp edges subtly reflects.

Wednesday 15 June 2016

@Phil [ND16] 10: Business Cards; Third Draft - Front & Back

I have incorporated the edits Phil suggested in my previous post. I've made Iron's head stand out by darkening his torso texture and provided two versions of this, because I'm not sure if Version 1's torso is too dark (IBV1)?

For Approval / Feedback

Front (Third Draft)

Hydrogen Twins Revised Back Design (HBV1)

Iron Revised Back Design V1 (IBV1)

Iron Revised Back Design V2 (IBV2)


Previously Approved

Oxygen Back Design V1 (OBV1)


Water Back Design (WBV1)

Monday 13 June 2016

@Phil [ND16] 09: Business Cards; Second Draft - Front & Back

In response to Phil's feedback on my previous post, I have re-designed my business card to incorporate all the relevant information on the card's front, and proudly displayed my characters on the back. I'm unsure which of the individual Hydrogen Twins and Oxygen back designs I want to go with, so I have provided two versions of each to choose from. In this case I prefer the Hydrogen twins original landscape orientation pose (HBV2). 

I'm not sure if Oxygen's image looks better with him surrounded by white space (OBV1), or whether it works with him filling the card (OBV2)? I've created multiple versions of the business card's front, and have chosen FV2 as my favourite.

Favourite

Front V2 (FV2)


Other Front Versions

Front V1 (FV1)

Front V3 (FV3)

Front V4 (FV4)

Front V5 (FV5) 

Back Designs

Oxygen Back Design V1 (OBV1)

Oxygen Back Design V2 (OBV2)

Water Back Design (WBV1)

Hydrogen Twins Back Design V1 (HBV1)

Hydrogen Twins Back Design V2 (HBV2)

Iron Back Design (IBV1)

Saturday 11 June 2016

@Phil [ND16] 07: Business Cards; First Draft - Front & Back

Like Josh, I plan to print my business cards with multiple back designs featuring my characters.

Front V1

Back V1

Back V2

Back V3

Back V4

@Phil [ND16] 06: Water Character; Forgotten Feature - Shoelaces 3D Testing

After spending some time figuring out how to best shape the laces texture to work on the curved geometry, I have provided 3 slightly different versions. Having looked at Water for so long without her laces, I can't decide whether she looks better with or without them? If these are indeed suitable in 3D, my favourite version is the Medium Laces.

3D Model Versions

Foot UV Map Versions

[ND16] 05: Water Character Complete; Full Rig Demonstration

Wednesday 8 June 2016

@Phil [ND16] 04: Showcase Images 04; All Pages

For Feedback

Water 3D Model

Water Design Development

Oxygen 3D Model

Hydrogen Twins 3D Models

Iron 3D Model Close-Up


Previously Approved

Oxygen Character Development

Hydrogen Character Development

Iron Character Development

Sunday 5 June 2016

@Phil [ND16] 03: Showcase Images 03; Oxygen, Hydrogen & Iron

Phil should I add another line of grayscale design development in Oxygen's display pic, and scale down the finalised Oxygen design to accommodate this? Also, on my previous post you mentioned putting all my characters on one page, but I'm not sure if you was referring to the information shown on my character trump cards, or something else?


Wednesday 1 June 2016

@Phil [ND16] 02: Showcase Images 02; Iron Design Dev - Test Page

Below I have provided a mock up of one of my showcase images. If feedback is positive I will re-create this as a high resolution version and will do the same for my Hydrogen, Oxygen and Water characters. If given the go ahead for this, one of my last three available pages will deal with character wireframes. Another will be dedicated to the development & finalisation of the Elements Academy logo. 

The final one will either feature Oxygen's character trump card from my previous post, or alternatively show better-lit versions of my posed characters - depending on the feedback on this post. If the lone trump card proves unsuitable for the New Designers display, I will re-interpret them for placement within my Making Of. At the time of posting, I've noticed I need to adjust the spacing of the colour swatches in relation to Iron's orthographics & head thumbnails.


Monday 30 May 2016

@Phil [ND16] 01: Showcase Images 01; Character Trump Cards

So far I have created trump cards for Oxygen, Hydrogen One and Hydrogen Two, I will also be creating individual cards for Iron and Water; making up 5 of the 7 showcase images available to me. They are all being designed at A1 scale, however due to the large size I am unable to save them out as very high resolution image files, resulting from unexpected problems with available RAM on my home computer; to solve this I will be sending the PSD over to Phil via WeTransfer. Any feedback is greatly appreciated!


Influence Image