Sunday 31 January 2016

[Major Project] 03: Iron Skinning 01; Basic Skeleton & Various Demonstrations


Iron will not walk in the conventional way, instead his walk will be more similar to that of a wind-up toy (see figure 1 & 2). Some features of the usual foot rig for a cartoon character will not be useful for Iron, such as Toe Tap or Heel Lift (see figure 3), Iron's feet are to be solid objects that will not undergo deformation. I have also researched into what Iron's blink might look like (see figure 4).

Fig. 1: Sadness wind-up toy walking (front) [source]

Fig. 2: Sadness wind-up toy walking (side) [source]

Fig. 3: Heel lift [source]

Fig. 4: Sonic blinking (edited) [source]

Because Iron does not have a neck, I have improvised his head's movements in the context of the alcove. Below is my demonstration of Iron's head rotations, using locators in place of the joints, and a spare head. This demonstration has also enabled me to figure out the max rotation values to which I can push the head before it hits the torso/alcove.


Using the very basic method of cutting a copy of Iron's head into two pieces, I have figured out the precise position for Iron's jaw rotation joint. In actual practice, the geometry will not be cut up, and will instead use a fall-off to reduce the movement of the 'chin''s point as much as possible, to keep the facial deformation to the front half of the head only; if this skinning method does not work out, I will try another method.


Wednesday 27 January 2016

Monday 25 January 2016

[Major Project] 01: Iron UV Mapping 01; First Attempt & Custom UV Grid

My Iron character has been fully textured to look like a Vinyl figure, however this was achieved solely within Maya. Without creating a reference object, the bump map would animate when Iron moved, which is not what I want. Rather than trying to avoid UV Mapping, I have decided I must get over my aversion towards it, especially in preparation for the eventual UV Mapping of my Oxygen and Water characters, because both have features that will definitely require a UV Map. My first attempt at UV Mapping Iron's head has turned out messier than expected, due to me performing an over-complex Automatic map, so I am going to restart the UVing process.

My custom UV Grid was created in Photoshop using this tutorial for the basic process. The UV Grid uses darkened versions of Graphite, Helium, Hydrogen, Iron, Oxygen and Water's primary colour schemes for its background. The letter squares use the Erlenmeyer flask from Elements Academy's logo.

My Elements Academy UV Grid

Current UV Mapping Progress
01

02

Iron Head Close-Up with Maya Textures

{next}

Wednesday 13 January 2016

@Alan @Phil: Stock-take in Preparation for Major Project

How my Minor Project went

Based upon the aim I had given myself for the minor project on the 6th November 2015, this project was for the most part unsuccessful:

To produce fully rigged 3D character models of Hydrogen, Oxygen, Iron and Water for episode one of Elements Academy, as well as expression sheets and concept art of the Academy exterior and Science classroom.

I have fully modeled Iron and partially modeled Hydrogen, however I have not modeled Water and Oxygen. Iron has also been textured to look like a vinyl figure, so this aspect is successful. Iron has not been rigged nor skinned, so I have entirely failed to achieve this aim, since no relevant characters are yet ready for animation. There are no expression sheets for any of the characters. Creation of concept art for the Academy exterior & science classroom interior has not been started.

All characters for episode one have been designed to a high standard and are considered a success, however orthographic projections have only been created for Iron, the Side View of which is not an accurate representation of what Iron would look like from his side. The design process of the characters began very slow, but has gradually become quicker.

It is positive to note that a successful logo has been designed and the merchandisability of Elements Academy has been thought about and incorporated throughout much of the work.

Based upon the graph below, the overall success of this project is only 6 out of 24, this low score is down to the amount of work submitted rather than the quality of said work.

Minor Project Aims Success Level
Iron
Oxygen
Water
Hydrogen
Academy exterior
Science classroom
Total
6/24
Finalised Design
1/1
1/1
1/1
N/A
0/1
0/1
3/5
Orthographics
0.8/1
0/1
0/1
N/A
N/A
N/A
0.8/3
3D Modelled
1/1
0/1
0/1
0.2/1
N/A
N/A
1.2/4
Rigged
0/1
0/1
0/1
0/1
N/A
N/A
0/4
Skinned
0/1
0/1
0/1
0/1
N/A
N/A
0/4
Textured
1/1
0/1
0/1
0/1
N/A
N/A
1/4

Next stages

1.    Create Iron’s skeleton
2.    Figure out how to prevent his bump map animating when he moves, or replace it with a Photoshop-based bump map, this would require UV mapping of Iron and as a result of all the other characters too.
3.    Skin Iron
4.    Rig Iron
5.    Design the Orthographic views for Water & Oxygen
6.    Finish modeling Hydrogen
7.    Either UV Map Hydrogen or apply the Vinyl texture
8.    Design the Academy’s exterior
9.    Create Hydrogen’s skeleton
10. Skin & Rig Hydrogen
11. Design the Science classroom

More stages to be listed…

Saturday 9 January 2016

@Phil [Minor Project] 45: Water Character; Shoelace Tests & Favourite Design

In response to Phil's feedback on my previous post I have tested out shoelaces to more clearly connect Water's feet to trainers. At first I was torn between 94 and 98, however I realised that whilst 94 was more simple, this simplicity may lead to the X shape being confused as just being a pattern rather than representing the laces, which 98's laces present as much more clearly. As a result, 98 is my favourite thumbnail.

Favourite

Water character thumbnails 83-98

Shoelaces Influence Map

[Minor Project] 44: Water Character; More Foot Thumbnails & Water 79-82

Feedback by Jackie on my previous Water foot designs indicated that the sole was a little too hoof-like, and that what the sole was supposed to be wasn't clear. Jackie showed me a sketch of Water's foot where the sole wasn't so obviously a separate part of the foot but rather part of the main shape; as if painted on to the foot rather than stuck on. Having a sole that is painted on would make the manufacturing of Water's feet easier when produced in the form of a merchandised toy.

Favourite

In response to Jackie's feedback I created more foot thumbnails. After selecting my favourite foot thumbnails (41, 52, 60 & 63) I tested them out with Water's body and hands, my favourite of which is 81. This will also act as Water's final non-orthographic front view.

Water foot thumbnails 41-65

Water character thumbnails 79-82

Why use a sole in the first place?
The point of the sole is to further connect Water to athleticism and energy by taking design inspiration from trainer shoes; this connection will be much clearer in Water's side view. Because of the wide usage of trainers by both sexes in reality, this may also help to suggest that Water is not a 'girly-girl'; at least via contrast to more clearly feminine footwear such as heels.

With all these extra design elements, how have you kept to your 4-colour rule?
I have kept to my rule of a maximum of 4 colours per character by using the same bluish-white for both the headband and sole. While in the design itself more than four colours/shades of blue have been used, in the case of the mouth and nose this is only for clarity. As a 3D model the only colours that will be used are: white for the eye-whites (sclera), black for the pupils & lashes, bluish-white for the headband & sole, and blue for the body's colour.

Monday 4 January 2016

@Phil [Minor Project] 42: Water Character; Hand Thumbnails & Water 70-74

I have decided to keep my favourite colour scheme presented in my previous Water post. Next up I will be designing Water's feet, meanwhile my favourite hand thumbnail is H14 and my favourite hands & body thumbnail is 74.


Favourite

Water character hand thumbnails H01-H18

Water character hand & body thumbnails (70-74)

Saturday 2 January 2016

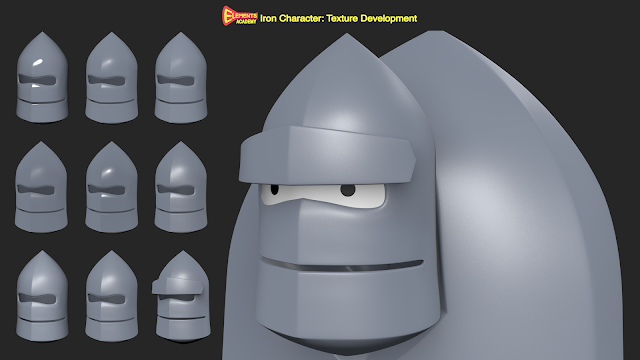
[Minor Project] 41: Iron Character; Torso, Hands & Feet 3D Models Dev


Textured Iron character model

@Phil [Minor Project] 40: Water Character; Colour Tests 01-05

Because I was already dealing with blue during Oxygen's colour testing, I have decided to begin my Water colour testing by picking from some of his colour tests. As usual I will also do some colour picking using my Water character's Influence Map, but for now CL02 is my favourite.

Favourite Water colour test & Oxygen comparison (not to scale)


Oxygen's colour tests

Water's Influence Map