Showing posts with label adobe photoshop. Show all posts

Wednesday, 2 October 2019

{CG Cookie} Blender 2.8 - Low Poly Rocket Takeoff and Life Update

After a long and exhausting battle with depression, lack of motivation and a lost spark since graduating UCA Rochester's Computer Animation Arts course in 2016 caused by my lifelong struggle with Inattentive ADHD and living with Asperger's Syndrome, completing this tutorial meant a heck of a lot to me.


Switching to Blender

As mentioned on my Twitter when I uploaded the video on 19th August, the low poly rocket launch marks my first proper foray into Blender since first stepping foot in Autodesk Maya in 2011. I made this difficult decision for two reasons:

🔘 I had not kept up with the technology due to said lack of spark (last Maya version I worked in is 2016) and after my free student version finally ran out I couldn't reasonably afford the £36 a month for Maya LT, let alone the £222/m of the full version. I had also switched to GIMP as my image editor, again, after my discounted student version of the Adobe Creative Suite ran out.

🔘 I'd heard of the free software and its many possibilities through my occasional writings with the GarageFarm.NET render farm, and was strongly recommended Blender by a staff member who I'd developed a rapport with.


CG Cookie & Regaining my Spark

The 3d modelling side of things had long been my passion until the conclusion of my studies, after which there was a smattering of 3d projects, all but two of went unfinished - the exceptions having been commissioned by my friend, a 3d printing and cosplay enthusiast. This July I became a CG Cookie "Citizen" for $29/m (about £23.50) and I'm so glad I did. I'm gradually regaining my spark for 3d modelling, and it's helping me gain an appreciation for the later stages of the 3d animation pipeline, ones I had developed a great dislike for within the pressure cooker of uni.


Current & Future Projects

At the moment I'm following parts of their Blender Mesh Modeling Bootcamp to learn about the various tools Blender has to offer, and have found myself often impressed by just how amazingly intuitive it can be! After I have completed the current tutorial I plan to switch back to some previously long forgotten creative work that I'm excited to turn into a 3d model and maybe, just maybe, take forward into the once-dreaded texturing and animation stages. Watch this space!


Sunday, 12 March 2017

[IdiotEngine] 02: 'Civil War' Spider-Man Lens Modelling

As part of my continued collaboration with JD under the banner of IdiotEngine, I have 3D modelled Spidey's more complex shutter-based lens from 2016's Captain America: Civil War for JD to 3D print. 

This was a fun little modelling project, and is the first time that I've needed to keep in mind the real world dimensions of an object since my final Elements Academy uni project last year. If you'd like to find out more about the methodology behind the creation of this lens 3D model, please scroll down to the bottom of the post.

Finished Model


Development


Influence Map
Influence 01 was chosen by JD as a guide for final shape of the 3D model

Methodology
The worldwide fangasm-inducing amazing shot of Spider-Man holding Captain America's shield, first seen in the trailer (source)

To figure out the height of the lenses I used a cropped head-only version of the above film still featuring Tom Holland's Spider-Man to estimate the actual height of his lenses (10cm / 3.94"); I did this via a combo of Photoshop guides and research into the average height of a human head (8–9"). This enabled me to model a 1:1 scale version of these unique Spidey lenses within Autodesk MayaTo avoid it looking puffy in reality, the lens model needed to be no more than 1cm thick, but also able to support several layers of overlapping geometry, so I had to find out if JD's da Vinci 1.0 3D printer would be able to print at a small enough scale. 

It turns out that by adjusting the print speed the machine is impressively able to handle minuscule scales of at least a ¼ millimetre, so having each of the nine lens slides created just 1mm thick will be no problem when JD prints it. This also means that if he needs to squish the lenses even thinner, such as half a cm thick, he has plenty of room to do so.

XYZ Printing's da Vinci 1.0 3D printer (source)

Within Maya itself, the fact that the lens would have no moving parts meant I was able to create each slice of the shutter geometry with its side and inside edges piercing the geometry surrounding it to increase the ease of modelling, and to ensure that there was no chance of unwanted holes within the geometry. Every individual part of the lens began life as a perfectly square polygon plane which I then scaled, stretched, and extruded its leading edge multiple times to create a very low poly version of its future self. 

Adding complexity to this basic shape is where the Multi-Cut Tool came in, I used it to quickly and easily create new edge loops exactly halfway between each polygon edge (Mac: ctrl + shift), which I then carefully dragged using the Move tool to sit along the appropriate edge of the vector art/orthographic I'd created from the guide photo. 

I also used Smooth Preview and Vertex Mode to figure out the correct positioning of each poly edge. Extrude was used again to give each 2D lens plane depth, Reverse Normals was used to sort out the resulting geo, I held down X when using Extrude's move function to snap the base of each lens part to the grid floor, and finally Bevel was vital for the edges of the geo keeping shape when smoothed. When the lenses are due to be 3D printed, I'll permanently Smooth the geo and export both the left & right lenses out as STL_DCE files.

Thursday, 8 December 2016

The Sad Robot, How it Came to Be

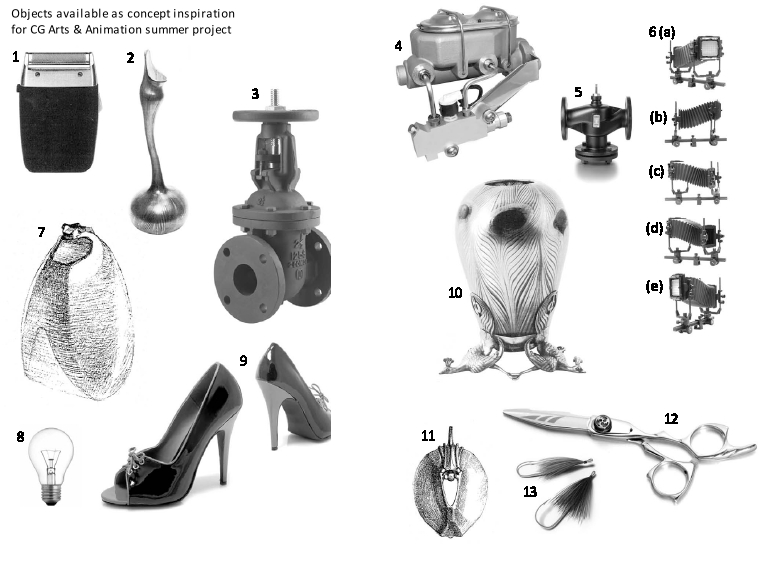
Back in the summer of 2013, fresh out of college and having chosen UCA's CG Arts & Animation course (now known as Computer Animation Arts) as my go-to destination for University, our course leader-to-be set us the task of adapting 13 random objects (Fig. 2) into 100 concepts, before translating 3 of those concepts into orthographic projections of a machine, life-form and a structure; concepts 24, 88 and 41 respectively. Looking back I remember worrying over getting all 100 sketches done, but once I got into it I was well on my way to 101. Wow, 19 year old me stressing over 100 thumbnail sketches, oh how little I knew back then!

Roll forward 3 years to post-graduation, looking for inspiration I decided I'd use my improved graphic design and 3D modelling skills to turn some of these hand drawn sketches into clean orthographics, and finally a working 3D model.  The aim is to build the robot to work like machine, one that that can be rigged and manoeuvred appropriately. In my next progress update I will be publishing screenshots of the digital orthographic development and modelling process up to this point.

Fig. 1: 3 years in the making, 1 & 0 (on & off)

Fig. 2: The original objects

Tuesday, 5 July 2016

[ND16] 17: The Art of Elements Academy; Re-Upload

For unknown reasons my original Art Of upload on Scribd can not be accessed on the website, claiming that this document has been removed from Scribd, even though it is accessible when I'm signed in to the website, meaning other people are unable to embed it. The same problem occurs when I re-upload a new version, so I've uploaded it with Google Docs instead.


The embed code is: 

<iframe src="https://drive.google.com/file/d/0B6IRjigAdvGFaG1iVHUxMVdSdTQ/preview" width="640" height="480"></iframe>


For this blog post I have changed the code's width value to "750", which automatically changes the height with it.

Thursday, 16 June 2016

@Phil [ND16] 11: Business Cards; Hydrogen Twins Edit

Below is my edited version of the Hydrogen twins back design. I've rendered the two characters separately to remove the face shadows from Hydrogen 02 and composited them together in Photoshop. Previously approved business card images can be found here...


I'm printing my business cards with moo.com, because it allows me to include multiple different back designs in any set (e.g. 50 cards). It also provides the option of giving your business cards rounded edges, an option that I am definitely going for due to the child-friendly nature of my characters, which using smooth, rather than sharp edges subtly reflects.

Wednesday, 15 June 2016

@Phil [ND16] 10: Business Cards; Third Draft - Front & Back

I have incorporated the edits Phil suggested in my previous post. I've made Iron's head stand out by darkening his torso texture and provided two versions of this, because I'm not sure if Version 1's torso is too dark (IBV1)?

For Approval / Feedback

Front (Third Draft)

Hydrogen Twins Revised Back Design (HBV1)

Iron Revised Back Design V1 (IBV1)

Iron Revised Back Design V2 (IBV2)


Previously Approved

Oxygen Back Design V1 (OBV1)


Water Back Design (WBV1)

Monday, 13 June 2016

@Phil [ND16] 09: Business Cards; Second Draft - Front & Back

In response to Phil's feedback on my previous post, I have re-designed my business card to incorporate all the relevant information on the card's front, and proudly displayed my characters on the back. I'm unsure which of the individual Hydrogen Twins and Oxygen back designs I want to go with, so I have provided two versions of each to choose from. In this case I prefer the Hydrogen twins original landscape orientation pose (HBV2). 

I'm not sure if Oxygen's image looks better with him surrounded by white space (OBV1), or whether it works with him filling the card (OBV2)? I've created multiple versions of the business card's front, and have chosen FV2 as my favourite.

Favourite

Front V2 (FV2)


Other Front Versions

Front V1 (FV1)

Front V3 (FV3)

Front V4 (FV4)

Front V5 (FV5) 

Back Designs

Oxygen Back Design V1 (OBV1)

Oxygen Back Design V2 (OBV2)

Water Back Design (WBV1)

Hydrogen Twins Back Design V1 (HBV1)

Hydrogen Twins Back Design V2 (HBV2)

Iron Back Design (IBV1)

Saturday, 11 June 2016

@Phil [ND16] 07: Business Cards; First Draft - Front & Back

Like Josh, I plan to print my business cards with multiple back designs featuring my characters.

Front V1

Back V1

Back V2

Back V3

Back V4

Wednesday, 8 June 2016

@Phil [ND16] 04: Showcase Images 04; All Pages

For Feedback

Water 3D Model

Water Design Development

Oxygen 3D Model

Hydrogen Twins 3D Models

Iron 3D Model Close-Up


Previously Approved

Oxygen Character Development

Hydrogen Character Development

Iron Character Development

Sunday, 5 June 2016

@Phil [ND16] 03: Showcase Images 03; Oxygen, Hydrogen & Iron

Phil should I add another line of grayscale design development in Oxygen's display pic, and scale down the finalised Oxygen design to accommodate this? Also, on my previous post you mentioned putting all my characters on one page, but I'm not sure if you was referring to the information shown on my character trump cards, or something else?